Getting started
FastSTI takes as input a configuration file which tells it how many simulations to run, and how to run each simulation. It also takes data as input in files that we call datasets. And optionally, it takes a file of agents, though the agents can be generated by FastSTI itself, via instructions in the configuration file.
The outputs are a report of simulation results, and the agents.
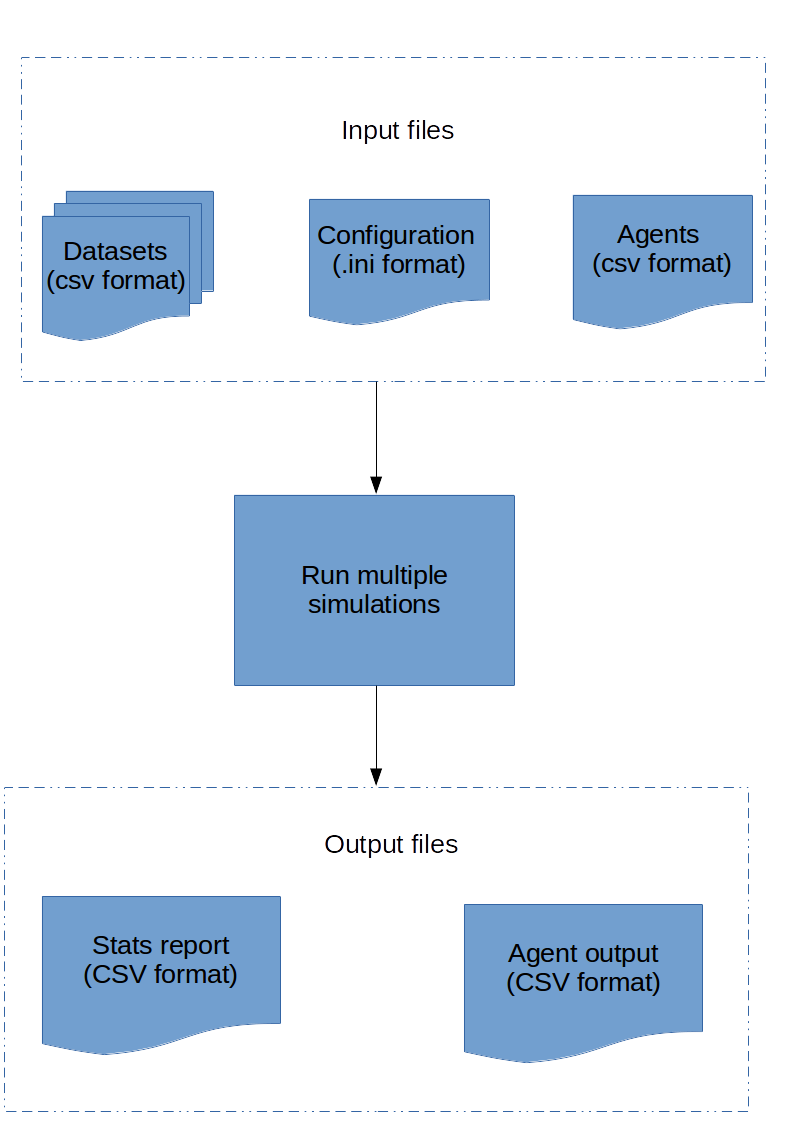
FastSTI inputs include a configuration file, datasets and agent files. The outputs are an agent file and simulation results.
Simulations
A simulation continuously iterates over sets of agents, executing events on the agents on each iteration (which we call a time step). The structure of a FastSTI simulation is:
Execute events before simulation runs
for each time-step
  for each event E
      for each agent A
          if E should be applied to A
              apply E to A
Execute events after simulation runs
The number of agents and the specific events to execute are specified in a configuration file. FastSTI’s configuration file uses the .ini format, which are the standard simple configuration format used on MS Windows and the GTK framework popular on Linux systems.
You can configure the number of agents, the events and the order of events that execute upon them, the size of the time step (default 1 day), the number of time steps (default 10 years) and much else (see Configuration file parameters).
FastSTI has a number of useful built-in events useful for modelling STI epidemics (see Events). These include agent ageing, death, matching agents in sexual relationships, infection with the STI, disease advance, co-infection, and breakups.
There are also useful supporting events that read in agent files or generate the agents, write the agents to a CSV file, and write basic statistics to a CSV file.
If you need more events, the framework has been designed with extensibility in mind. You can define new events in C, identify them to FastSTI, quickly recompile the code and use them.
Example
Let’s start off with the simplest simulation. Change into the simulations/examples directory. Take a look at eg1.ini.
# Faststi "Hello world" equivalent simulation
[Simulation_0]
after_events=_report
The first line is a comment.
The second line is the name of the simulation group: First simulation. A simulation group can have one or more simulations. This particular group has only one simulation.
The third line is one of the dozens of parameters used to configure simulations. The after_events parameter tells FastSTI what events to execute when the simulation is finished. _report is a built-in event that prints out basic information about the state of a simulation. All built-in events are prefixed with an underscore, to differentiate them from ones you might code yourself.
To run the simulation:
FSTI_DATA=../../data faststi -f eg1.ini
The output may look something like this:
First simulation;0;0;2028-01-01;MIN_AGE_ALIVE;nan
First simulation;0;0;2028-01-01;MAX_AGE_ALIVE;nan
First simulation;0;0;2028-01-01;MEAN_AGE_ALIVE;nan
First simulation;0;0;2028-01-01;MEDIAN_AGE_ALIVE;nan
First simulation;0;0;2028-01-01;INFECT_RATE_ALIVE;-nan
First simulation;0;0;2028-01-01;POP_ALIVE;0
First simulation;0;0;2028-01-01;NUM_PARTNERS;0
First simulation;0;0;2028-01-01;MIN_AGE_DEAD;nan
First simulation;0;0;2028-01-01;MAX_AGE_DEAD;nan
First simulation;0;0;2028-01-01;MEAN_AGE_DEAD;nan
First simulation;0;0;2028-01-01;INFECT_RATE_DEAD;-nan
First simulation;0;0;2028-01-01;POP_DEAD;0
First simulation;0;0;2028-01-01;INITIAL_INFECTIONS;0
First simulation;0;0;2028-01-01;SIMULATION_INFECTIONS;0
First simulation;0;0;2028-01-01;INITIAL_MATCHES;0
First simulation;0;0;2028-01-01;SIMULATION_MATCHES;0
First simulation;0;0;2028-01-01;BREAKUPS;0
First simulation;0;0;2028-01-01;TIME_TAKEN;0
Note that it’s in csv format, so you easily import it into Python or R and process it. You can also redirect the output to a file instead of standard output with the results_file parameter.
The fields of the csv file are: the name of the simulation, the number of the current simulation, the number of the simulation within the current simulation group, the date within the simulation for which the output applies, a description field, and the value of the description field. E.g. the last two columns of the last line are TIME_TAKEN and 0. This tells you that it took zero seconds for the simulation to run. Likewise the POP_ALIVE and POP_DEAD entries tell us that the population alive and dead in this simulation on 1 January 2028 is 0.
Prefixing every run with setting the FSTI_DATA directory is tedious. Let’s fix that. In a POSIX environment (Linux, FreeBSD etc) that’s easy. Change into the faststi-0.2.2 directory. Now set and export the FSTI_DATA environment variable like this:
export FSTI_DATA=`pwd`/data
Test that it’s working:
faststi -t
If no errors are reported, then it’s working. But at present you’ll have to execute the export command every time you open a terminal. To make it permanently part of your environment, place it in your .profile or .bashrc scripts, depending on the flavour of POSIX you’re using.
A full simulation
The output of the eg1.ini simulation is rather uninteresting. To get more interesting output we need a more interesting simulation. Take a look at eg2.ini.
1 2 3 4 5 6 7 8 9 10 11 12 13 14 15 16 17 18 19 20 21 22 23 24 25 26 27 28 29 30 31 32 33 34 35 36 37 38 39 40 | # First interesting simulation
[Full simulation]
num_simulations=4
num_agents=10000
time_step=1 DAY
simulation_period=10 YEARS
before_events=_write_agents_csv_header;_generate_and_pair;_report;_write_agents_csv
during_events=_age;_breakup_and_pair;_infect;_stage;_birth;_death
after_events=_write_agents_csv;_report
dataset_gen_sex=dataset_gen_sex.csv
dataset_gen_sex_preferred=dataset_gen_sex_preferred.csv
dataset_gen_infect=dataset_gen_infect.csv
dataset_gen_treated=dataset_gen_treated.csv
dataset_gen_resistant=dataset_gen_resistant.csv
dataset_gen_mating=dataset_gen_mating.csv
dataset_birth_infect=dataset_gen_infect.csv
dataset_birth_treated=dataset_birth_treated.csv
dataset_birth_resistant=dataset_birth_resistant.csv
dataset_rel_period=dataset_rel.csv
dataset_single_period=dataset_single.csv
dataset_infect=dataset_infect.csv
dataset_infect_stage=dataset_infect_stage.csv
dataset_mortality=dataset_mortality_simple.csv
agents_output_file=agents_out.csv
results_file=results.csv
threads=1
[Change time period]
threads=0 # As many threads as there are cores will execute
simulation_period=5 YEARS
|
Assuming you are in the simulations/examples directory you can run this simulation as follows:
faststi -f eg2.ini
This will take about 10 seconds to run, depending on your PC.
This is what the configuration does:
Line 1 is a comment. Comments start with a #.
Line 3 specifies the name of the first group of simulations: Full simulation
Line 5 specifies the number of simulations to run in this group. Note that parameter names, like num_simulations, are case-sensitive.
Line 6 specifies the number of agents in the simulation.
Line 7 specifies the time period represented by each simulation iteration, 1 day in this case. The format for this parameter and others like it that specify a time period is a positive integer followed by either MINUTE, HOUR, DAY, WEEK, MONTH or YEAR. You can also use the plural of any of these time periods or any combination of lower and upper case (i.e. minute, minutes, hour, hours, day, days, week, weeks, month, months or year, years). You can also put a hyphen instead of a space between the integer and the time period. If you leave out the time period, it’s assumed to be minutes. In FastSTI, the predefined time period have the following number of minutes:
- hour: 60
- day: 1,440
- week: 10,080
- month: 43,830
- year: 525,949
Line 8 specifies the simulation period: 10 years in this case. The number of time steps (or iterations) of the simulation is calculated by dividing the simulation_period by the time_step. In this simulation there are therefore 3,652 iterations: \(10 \times 525949 / 1440\).
Line 10 lists the events that are to be run before each simulation starts.
- The _write_agents_csv_header event simply writes the first line of the csv file to which agents will be written.
- The _generate_and_pair event generates agents (equal to the num_agents parameter) and pairs a subset of them in sexual relationships.
- The _report event prints out some simple statistics about the agent population.
- The _write_agents_csv event prints out the agents in csv format.
Line 11 lists the events that are run on every iteration of the simulation.
- The _age event increases the age of each agent by the time_step of the simulation (one day in this example).
- The _breakup_and_pair event pairs a subset of agents into sexual partnerships and breaks up another subset of agents who are already in sexual partnerships.
- The _infect event infects a subset of agents in sexual partnerships with other infected agents with the pathogen being studied, e.g. HIV.
- The _stage event manages the infection progression of infected agents. For example, agents with HIV will first be in an acute sero-conversion phase, than a chronic infection stage, and then one or more stages that are analogous to progression to AIDS.
- The _birth and _death events create new agents and kill agents respectively.
Many of these events depend on pre-specified parameters to calculate probabilities of the events occurring and, perhaps, other outcomes. These data are described in dataset files which are described in the Datasets section.
Lines 14 to 29 list the names of the datasets associated with the various events. For example the dataset_mortality parameter tells the simulation the probability of an agent with a given set of characteristics dying.
Line 32 tells the simulation to write agents out to a csv file called agents_out.csv.
Line 33 tells the simulation to write simple population level statistical information produced by the _report event to a file called results.csv.
Line 35 tells the simulation to run as a single thread. In other words each of the four simulations (specified on line 5) will run consecutively.
Line 37 specifies a new simulation group called Change time period.
Line 39 tells FastSTI to run the simulations in parallel, using up to as many threads as there are CPU cores in the machine. On a quad-core CPU, all four simulations could run at the same time.
Line 40 specifies a different simulation period (5 years) to the Full simulation set of simulations. All other parameters set in the Full simulation set carry through to this simulation set.
There are more configuration examples in the simulation directory.